DIY Mason Jar Lights: A Rustic & Charming Decor
Transform mason jars into beautiful and functional lights. These easy DIY projects will add a rustic and charming touch to your home. Mason jars are incredibly versatile, and with a few simple materials, you can create stunning lighting solutions for any room. Whether you’re looking to brighten up a patio, create a cozy bedroom ambiance, or add a touch of farmhouse style to your kitchen, these DIY mason jar lights are the perfect solution. This project is ideal for all skill levels, with clear, easy-to-follow instructions. Beyond lighting, repurposing everyday items like mason jars is a wonderful way to express creativity and embrace a sustainable lifestyle – just like painting rocks to add a splash of color to your garden. This project aligns perfectly with that spirit of resourceful crafting.
What You'll Need
- Mason Jars (any size, number depends on the desired quantity)
- String Lights (LED string lights are recommended for safety and efficiency - fairy lights work great!)
- Drill (optional, for creating ventilation holes – more on this later)
- Sandpaper (optional, for smoothing rough edges)
- Twine or Ribbon (for hanging or decorative purposes)
- Hot Glue Gun & Glue Sticks (optional, for securing twine/ribbon)
Step-by-Step Instructions
Step 1: Preparing the Mason Jars
First, thoroughly clean your mason jars inside and out. Ensure they are completely dry before proceeding. If you’re using vintage jars, a good scrub will remove any residue. At this stage, you can also use sandpaper to gently smooth any rough edges around the rims of the jars for a more polished look. This step is optional but recommended. Think about how you might extend this idea to other glass containers – perhaps you're looking to refresh some old vases with a vibrant new look? You could explore some DIY Painted Vases for a similarly rewarding project.
Step 2: Drilling Ventilation Holes (Important for Safety!)
This is a crucial step! If you're using LED string lights, the heat output is minimal, but if using traditional incandescent lights, ventilation is essential to prevent heat buildup and potential hazards. If you are using LED lights this step is optional. Using a small drill bit (around 1/4 inch), drill a few small holes in the lid of the mason jar. This will allow heat to escape if needed. Always wear safety glasses when drilling!
Safety Note: Always supervise the lights and never leave them unattended. If you are unsure about this step, skip it and use LED lights. The focus on safety also mirrors the care needed for other craft projects, like creating unique candle holders for ambiance.
Step 3: Adding the String Lights
Carefully insert the string lights into the mason jars. Distribute the lights evenly inside the jar, making sure they are not clumped together. The number of lights you use will determine the brightness of the light. Consider the overall aesthetic you're aiming for – a warm glow might complement hand-painted details, allowing your artistry to truly shine.
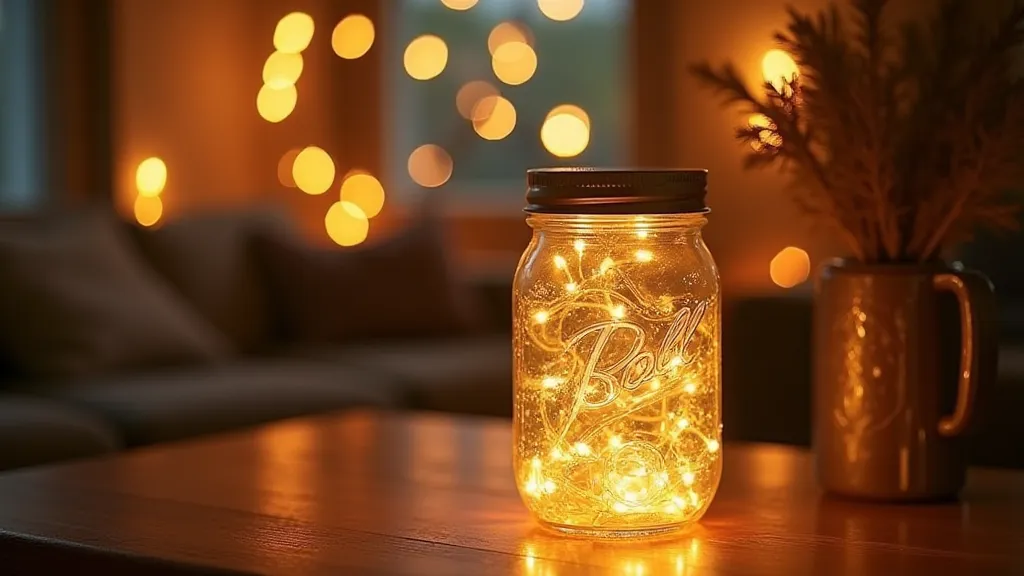
Step 4: Securing and Decorating (Optional)
If you’re hanging the lights, tie twine or ribbon securely around the neck of the jar. A hot glue gun can be used to further secure the twine or ribbon, but this is not required. Get creative with your decoration! You can wrap twine around the jar for a rustic look, or add small embellishments like beads or fabric scraps. Decorating mason jar lights is just one way to add personal touches to your home; another avenue for expressing creativity could be adorning flower pots, breathing new life into old containers with a fresh coat of paint.
Variations & Ideas
- Painted Jars: Paint the outside of the mason jars with acrylic paint in your desired color for a more personalized look. The possibilities are truly endless – from delicate floral patterns to bold geometric designs.
- Frosted Jars: Use etching cream to create a frosted effect on the jars. This creates a softer, diffused light and adds a touch of elegance.
- Rustic Table Centerpiece: Group several mason jar lights together on a table for a beautiful centerpiece. Consider layering different sizes and heights for added visual interest.
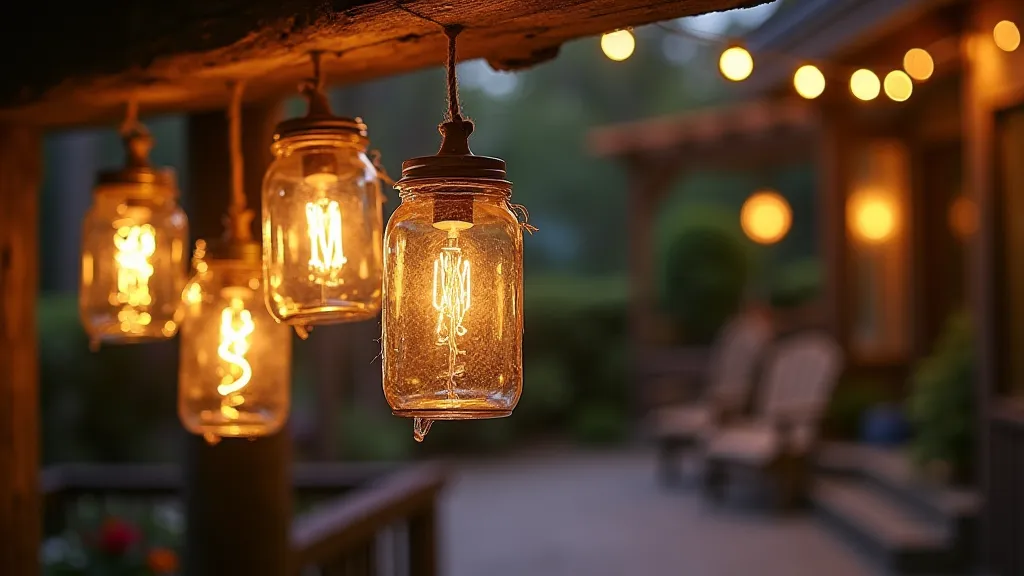
- Outdoor Decor: Hang the lights on a patio or porch to create a warm and inviting atmosphere. Combine with other outdoor decorations like painted rocks for a cohesive look. Creating inviting outdoor spaces often involves a combination of lighting, color, and texture – like adding color and charm with DIY Painted Rocks.
- Layered Lighting Effects: Combine different colored string lights for a truly unique ambiance. Experiment with different patterns and intensities to create the perfect mood for any occasion.
- Thematic Designs: Create mason jar lights that reflect your personal interests or the season. For example, use nautical-themed embellishments for a coastal vibe or autumnal colors for a harvest feel.
- Repurposed Materials: Don't be afraid to incorporate found objects into your mason jar light creations. Buttons, beads, shells, and dried flowers can all add a touch of personality and charm.
- Combined Crafts: Integrate your mason jar lights with other DIY projects to create a truly cohesive and personalized home decor scheme.
Tips & Troubleshooting
- Light Distribution: If your lights appear too dim, try distributing the string lights more evenly within the jar. You can also add a layer of reflective material, such as aluminum foil, to the inside of the jar to amplify the light.
- Heat Management: If you're using incandescent lights, ensure adequate ventilation to prevent overheating. Consider using a smaller number of lights or switching to LED lights for a safer and more energy-efficient option.
- Securing Decorations: Use a strong adhesive, such as hot glue or epoxy, to secure decorations to the jar. For added durability, apply a sealant over the decorations to protect them from moisture and wear.
- Creating Different Looks: Experiment with different colored paints, ribbons, and embellishments to create a wide range of looks. Don't be afraid to try new techniques and combinations to create your own unique style.
- Safety First: Always prioritize safety when working with tools and materials. Wear appropriate safety gear, such as gloves and eye protection, and follow all manufacturer's instructions.
Conclusion
Creating DIY mason jar lights is a fun, affordable, and rewarding project. Not only will you create beautiful and unique lighting for your home, but you’re also giving new life to a classic jar. With a little creativity and effort, you can transform these simple jars into stunning works of art! They are a fantastic way to embrace a sustainable lifestyle, transforming everyday items into cherished decorations. If you enjoy repurposing and crafting, you might also find joy in crafting beautiful and personalized Easy DIY Candle Holders to complement your mason jar lights.